Saturday, December 12, 2015

PIVOT in ODI 12c

How to Implement PIVOT component in ODI 12c?

Scenario:
To avoid redundant data

Scripts:

CREATE TABLE STUDENT_LOC(
SNAME VARCHAR2(30),
PREFERENCE VARCHAR2(20),
LOCATION VARCHAR2(20));

INSERT INTO STUDENT_LOC VALUES('TRINESH','LOCATION1','HYDERABAD');
INSERT INTO STUDENT_LOC VALUES('TRINESH','LOCATION2','BANGALORE');
INSERT INTO STUDENT_LOC VALUES('SHANTHI','LOCATION1','HYDERABAD');
INSERT INTO STUDENT_LOC VALUES('SHANTHI','LOCATION2','BANGALORE');
INSERT INTO STUDENT_LOC VALUES('BAPI','LOCATION1','HYDERABAD');
INSERT INTO STUDENT_LOC VALUES('BAPI','LOCATION2','USA');
INSERT INTO STUDENT_LOC VALUES('RAJU','LOCATION1','USA');
INSERT INTO STUDENT_LOC VALUES('RAJU','LOCATION2','BANGALORE');
INSERT INTO STUDENT_LOC VALUES('DEEPAK','LOCATION1','DUBAI');
INSERT INTO STUDENT_LOC VALUES('DEEPAK','LOCATION2','HYDERABAD');
COMMIT;

CREATE TABLE STUDENT_LOCATION (
SNAME VARCHAR2(30),
LOCATION1 VARCHAR2(20),
LOCATION2 VARCHAR2(20));
/

Steps to Implement:
1.     Create new Mapping
2.     Drag and drop source datastore(STUDENT_LOC) and target datastore from model(STUDENT_LOCATION )
3.     Drag and drop Pivot component from component palette into mapping editor
4.     Connect output connector of PIVOT to input connector of Target datastore
It will pop up as below:


Enable checkbox “Create Attributes On Source” and “Auto Map” and click on OK.
5.     Connect output connector of source datastore to input connector of Pivot Component
6.     Disable checkbox “Create Attributes on Target”
7.     Select Pivot component and go to property inspector
8.     For Sname under expression select “Sname” from source datastore
Row Locator: Select “Preference” Column from source Datastore
Click ok “+” symbol to create ROW Locator values
“LOCATION1”
“LOCATION2”
Under “Matching row” for LOCATION1 column in pivot component select “LOCATION1” and for expression select “Location” Column
Under “Matching row” for LOCATION2 column in pivot component select “LOCATION2” and for expression select “Location” Column
It looks as below:
 
9.     Select appropriate knowledge module in physical tab by selecting target datastore (IKM Oracle insert.Global by default it will comes, you can leave as it)
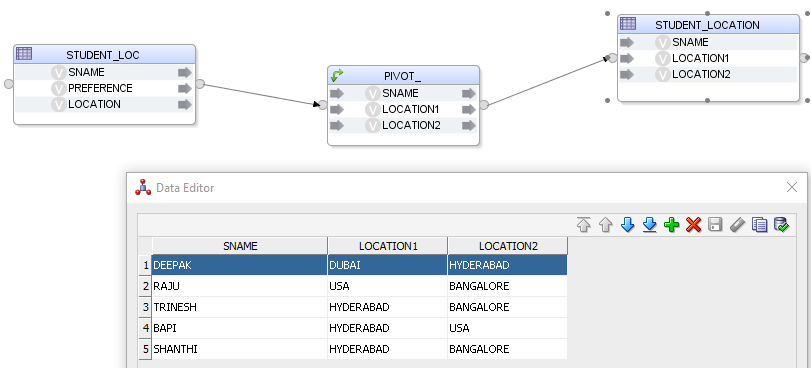
10. Execute Mapping
Output & Flow:


ORA-12560: TNS:protocol adaptor error

How to resolve TNS: Protocol Adaptor Error

1. Go Start --> Run
2. Enter services.msc
3. Start below services

  • OracleMTSRecoveryService
  • OracleServiceXE
  • OracleXEClrAgent
  • OracleXETNSListener
4. Now try to reconnect. It will resolve your issue.

Sunday, November 15, 2015

UNPIVOT ODI 12C

UNPIVOT ODI 12C
Scripts:
CREATE TABLE SALES(
YEAR          VARCHAR2(4) ,
Q1      NUMBER(10,2) ,
Q2     NUMBER(10,2) ,
Q3      NUMBER(10,2) ,
Q4      NUMBER(10,2) );
/
CREATE TABLE SALES_PER_QUARTER(
YEAR VARCHAR2(4),
QUARTER VARCHAR2(2),
SALES NUMBER(10,2));
/
INSERT INTO SALES VALUES('2014',23345.32,32456.41,21234.21,18324.12);
INSERT INTO SALES VALUES('2015',24324.12,34234.51,25345.18,17234.86);
COMMIT;
/

Steps:
1.       Create new Mapping
2.       Drag and drop Source datastore and target datastore
3.       Drag and drop unpivot component from component palette into Mapping editor
4.       Connect UNPIVOT and target datastore and select as below screen

5.       Click ok
6.       Now connect source datastore and UNPIVOT component and deselect the create attributes on Target
7.       Select unpivot component and go to property inspector (Ctrl+Shift+i)
8.       Select Row Locator as Quarter under – General tab
9.       Click on “+” symbol and add four columns as below


10.   Execute the mapping
11.   Output:


Completed Successfully!!!!

Saturday, November 14, 2015

Unable to Reverse Engineering Synonym in ODI 12c

Unable to Reverse Engineering Synonym in ODI 12c


Issue:
We can able to see the Synonym but after Reverse Engineer structure of datastore is empty

     Steps to be the followed to fix:

1. Check your Logical Schema and context for that model

2. Logical Schema will be available in overview tab of model and context will be available under Reverse Engineer Tab of the model

3.Go to Topology Navigator then Logical Architecture  and check logical schema for that particular context and find out your data Server (for eg: xyz.abc that means xyz is Data Server and abc is Physical Schema)

4.In the physical Architecture, go to Data server and then properties tab and add the following:
"key= includeSynonyms and value= true"

5.Now you are able to perform Reverse Engineer for synonym !!!!!!!!

Thursday, September 10, 2015

How to implement un-pivot concept in ODI 11g


SQL Scripts used in Demo:
CREATE TABLE SALES(
YEAR          VARCHAR2(4) ,
Q1      NUMBER(10,2) ,
Q2     NUMBER(10,2) ,
Q3      NUMBER(10,2) ,
Q4      NUMBER(10,2) );
/
CREATE TABLE SALES_PER_QUARTER(
YEAR VARCHAR2(4),
QUARTER VARCHAR2(2),
SALES NUMBER(10,2));
/
INSERT INTO SALES VALUES('2014',23345.32,32456.41,21234.21,18324.12);
INSERT INTO SALES VALUES('2015',24324.12,34234.51,25345.18,17234.86);
COMMIT;
/

Scenario
In this scenario, we are converting rows into columns.
Implementing un-pivot component which is available in ODI 12c (which will be available from 12.1.3 version onwards) in ODI 11g

Process:
1.      Create model
2.      Create Reverse engineer above mention datastores
3.      Create new interface
4.      Drag and drop Source datastore (SALES) and Target Datastore (SALES_PER_QUARTER)
As mention below and map accordingly.

5.      Click on “highlighted” dataset symbol (in the above diagram) which will pop-up for datasets creation.
6.      Create four datasets for four quarters as below.

7.      Now interface looks as follows

8.      For Quarter2 –Quarter Column ‘Q2’ and Sales Column <Q2_Value>
Similarly we need to repeat for Quarter3 and Quarter4
9.      Make sure that Quarter mapping should be “Staging”
10.  Select appropriate knowledge as per your requirement (In this case I am selecting IKM SQL Control Append) and flow control as “false” (because I don’t have any key on target side)
11.  Execute it.

Output:

How to dump duplicate records into one table and Non-Duplicate records into one table in ODI 12c

Pre-requisites:
Scripts:
CREATE TABLE STUDENT
(SID NUMBER(2),
NAME VARCHAR2(50),
MARKS NUMBER(3));
/
INSERT INTO STUDENT VALUES(1,'Trinesh',99);
INSERT INTO STUDENT VALUES(2,'Tejesh',98);
INSERT INTO STUDENT VALUES(3,'Bapiraju',100);
INSERT INTO STUDENT VALUES(4,'Seetharamaraju',99);
INSERT INTO STUDENT VALUES(4,'Raju',100);
INSERT INTO STUDENT VALUES(5,'Dinesh',98);
INSERT INTO STUDENT VALUES(5,'Sai',100);
INSERT INTO STUDENT VALUES(6,'Asim',100);
/
COMMIT;
/
CREATE TABLE DUP_STUDENT
AS
SELECT * FROM STUDENT WHERE 1<>1;
/
CREATE TABLE NONDUP_STUDENT
AS
SELECT * FROM STUDENT WHERE 1<>1;

Process:
1.      Reverse Engineer above datastores and make sure those are available in your model
2.      Create new mapping
3.      Drag and drop STUDENT, DUP_STUDENT and NONDUP_STUDENT datastore


4.      Drag and drop  2 Aggregate component from component palette

5.      Connect output port of Source datastore (STUDENT) to input port of aggregate component. It will pop-up as follows. Leave it as it and click ok


6.      Select Aggregate Component and go to property inspector à General à In Side having clause mention as “count(*) >1” and in side Manual group by clause mention as “STUDENT.SID” and remove all attributes except SID.

As shown in below screen


7.      Drag and drop the STUDENT datastore once again and drag and drop Join component into mapping editor from component palette
8.      Join Aggregate component 1 to STUDENT Datastore as “AGGREGATE.SID = STUDENT1.SID”
9.      Connect output port of Join component to input port for Target datastore (DUP_STUDENT). It will pop-up then disable “Create attribute On source” and click ok
10.  Now connect output port of Source Datastore (STUDENT) to input port of Aggregate component 2. It will pop-up, leave it as it and click ok
11.  Remove all attributes except “SID” from distinct Component

12.  Select Aggregate Component and go to property inspector à General à In Side having clause mention as “count(*) = 1” and in side Manual group by clause mention as “STUDENT.SID” and remove all attributes except SID
13.  Drag and drop Join Component again into mapping editor.
14.  Join Aggregate component and STUDENT1 datastore as above diagram as “AGGREGATE1.SID = STUDENT1.SID
15.  Connect output port of join to the input port of target datastore (NONDUP_STUDENT) and click ok

Completed !!!!!

Wednesday, September 2, 2015

How to find second or nth highest salary?

Interview Question:

Query:  To Find Second Highest Salary

Using RowId:
SELECT EMPLOYEE_ID,SALARY,RN FROM
(SELECT EMPLOYEE_ID,
SALARY,
ROW_NUMBER() OVER(ORDER BY SALARY DESC) RN
FROM EMPLOYEES)
WHERE RN =2;


Using Sub-Query:

SELECT EMPLOYEE_ID , SALARY
FROM EMPLOYEES Emp1
WHERE (2-1) = (
               SELECT COUNT(DISTINCT(Emp2.SALARY))
               FROM EMPLOYEES Emp2
               WHERE Emp2.SALARY> Emp1.SALARY
               )


Query: To Find nth Highest Salary

Using RowId:
SELECT EMPLOYEE_ID,SALARY,RN FROM
(SELECT EMPLOYEE_ID,
SALARY,
ROW_NUMBER() OVER(ORDER BY SALARY DESC) RN
FROM EMPLOYEES)
WHERE RN =<n>;


Using Sub-Query:

SELECT EMPLOYEE_ID , SALARY
FROM EMPLOYEES Emp1
WHERE (<n>-1) = (
               SELECT COUNT(DISTINCT(Emp2.SALARY))
               FROM EMPLOYEES Emp2
               WHERE Emp2.SALARY> Emp1.SALARY
               )


Monday, August 31, 2015

How to delete duplicate records and retain one record among duplicates?

Scenario:
If we are having 5 duplicate records then you have to delete 4 records and retain 1 record.

Process:
Execute Following script:

CREATE TABLE TestTable(
Code Varchar2(1) ,
n number(2)
)
/
Insert into TestTable (CODE,N) values ('A',1);
Insert into TestTable (CODE,N) values ('A',2);
Insert into TestTable (CODE,N) values ('B',1);
Insert into TestTable (CODE,N) values ('B',2);
Insert into TestTable (CODE,N) values ('B',3);
Insert into TestTable (CODE,N) values ('C',1);
Insert into TestTable (CODE,N) values ('C',2);
/

Query to delete duplicate records and retain one record:

DELETE FROM TESTTABLE WHERE ROWID IN (SELECT ROWID FROM (
SELECT RN,ROWID FROM (
SELECT CODE,N,ROW_NUMBER() OVER(PARTITION BY CODE,N ORDER BY CODE DESC) RN
FROM TESTTABLE) WHERE RN>1));
/


Tuesday, August 18, 2015

Slowly changing Dimension in ODI


Process
1.     Create source and target data stores
2.     On Target datastore change OLAP Type to Slowly Changing dimension
3.     Expand target datastore and open all columns à under description select appropriate you need to perform (for e.g. add row on change, Overwrite on change ….)
[Note: Natural Key is must which column is unique as per source]
4.     Import IKM Oracle slowly changing dimension Knowledge module
5.     Create Interface in drag and drop source datastore from model into source side of editor and target datastore from target side of editor

For Example:
1.     Create Database tables as follows:
Source:
CREATE TABLE PRODUCT(
PID NUMBER(3,0),
NAME VARCHAR2(10),
            COST NUMBER(10,2))
Target:
CREATE TABLE PRODUCT_DIM(
PID NUMBER(3,0),
NAME VARCHAR2(10),
COST NUMBER(10,2),
FLAG VARCHAR2(2),
START_TIMESTAMP TIMESTAMP,
            END_TIMESTAMP TIMESTAMP)
2.     Reverse engineer those two tables in ODI
a.     Create model with correspondent logical schema selected
b.     Open Model (Double click it)
c.      Go to Reverse Engineer à Mast attribute “PRO%”
d.     Go to Selective Reverse Engineering à Enable selective Reverse Engineering , New Datastores and Objects to reverse Engineering
e.     Select the objects and click on “Reverse Engineer” at top
3.     Open Target datastore (Product_DIM) and select OLAP TYPE as “Slowly change dimension”
4.     Expand Target datastore à Expand columns à Double “PID” à Description Tab à SCD Behavior to “Natural Key”
“Name” à Description Tab à SCD Behavior to “Overwrite on change”
“Cost” à Description Tab à SCD Behavior to “Add row on change”
“Flag” à Description Tab à SCD Behavior to “Current Record Flag”
“Start_Timestamp” à Description Tab à SCD Behavior to “Starting Timestamp”
“End_timestamp” à Description Tab à SCD Behavior to “Ending Timestamp”
5.     Create project
6.     Import Knowledge à IKM Oracle Slowly Changing Dimension
7.     Create Interface and select appropriate Logical Schema
8.     Drag and drop Source datastore into source side and Target datastore into target side
9.     Auto map à Yes and for Flag = 0 , Start_Timestamp = systimestamp and end_timestamp = systimestamp
10.                        Go to Flow tab and select knowledge module as “IKM Oracle Slowly changing dimension” and flow control as “false”


ODI Exception Handling


Process:
1.     Create a load Plan scenario
2.     Create Scenarios to an interface - make sure atleast one interface should have error so that we can test
3.     In my case, I am creating one interface as error. (Source to target load -> Selecting IKM Oracle incremental load but there is no primary key in target datastore so that it will error out)
4.     Add Scenario to Load Plan
a.     By default you will have root step
b.     Right click on root step and click on add step à select serial
c.      Drag and drop scenarios from Load plans and scenarios tab on to the serial
d.     Create one procedure which indicate it as error (i.e., create procedure with one task à in target side write a query “Select ‘Error’ from dual” and select appropriate technology as “Oracle” and Logical schema)
e.     Generate scenario for above procedure and drag and drop that scenario into exception tab
·Click on “Plus” Symbol
·Add wizard
·Select Exception
·Name the exception
·Drag and drop the scenario on exception

f.       Select serial step à Go to property inspector à Under exception handling à Exception step , select appropriate exception