Friday, July 24, 2015

Split component in ODI 12c


Case Study:
We need to dump all the data which satisfying conditions into one table and unsatisfying data into another table (i.e., Simply we can say as rejected records in one table and accepted records in one table)
How to achieve it?
This can be achieved by using Split component in ODI 12c very easily.
For Demo Purpose – Scenario
We need to insert all records from employees table into employee to whom manager assigned and insert all records from employees table into emp_nomanager to whom manager is not assigned.

Pre-requisites:
1.     Employees, Employee and emp_nomanager Data Store of same structure should be available in Model
2.     Project already created

Steps
1.     Right click on Mappings and click on New Mapping
2.     Enter name of Mapping as Map.Manager and Non-Manager
3.     Disable create empty data set and click on ok
4.     Now drag and drop Employees , Employee and emp_nomanager datastores on to the Mapping Editor
5.     Drag and drop split component from component palette on to mapping editor
6.     Join Out port of Employees to Input port of Split component
7.     Join Out port of Split component to Input ports of Employee and emp_nomanager Datastores
8.     Popup will appear select
a.     Match Options
By Name
Ignore Case
b.     Create Actions
Auto map enable
9.     Click on ok
10.                         Now select Split component and go to Property inspector and then go to Split conditions à Select Output Connector Points
11.                        For Output1 à Splitter conditioner as “EMPLOYEES.MANAGER_ID is not null”
Output2 à Is Remainder is enabled

Completed Successfully!!!!!

Output
Employee Table
To view Data right click on Target datastores and click on data


Emp_nomanager Table

Tuesday, July 21, 2015

Creating and Managing Topology for Oracle Technology

1.    Creating Physical Architecture
Physical Architecture
a.     The physical architecture defines the different elements of the information system, as well as their characteristics taken into account by Oracle Data Integrator
b.     Each type of database (Oracle, DB2, etc.) or file format (XML, Flat File), or application software is represented in Oracle Data Integrator by a technology
c.      The physical components that store and expose structured data are defined as "Data Server"
d.     A data server is always linked to a single technology. A data server stores information according to a specific technical logic which is declared into physical schemas attached to this data server
       
Process to create Physical Architecture:
Data Server:
                               i.            Open ODI Studio
                             ii.            Connect to Master repository with Supervisor Privileges
                          iii.            Go to Topology Navigator
                          iv.            Expand Technologies and select Oracle Technology
                             v.            Right click on it, select New Dataserver
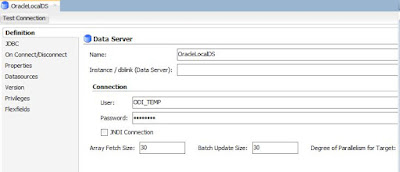
                          vi.            In the Definition mention as per below screenshot

Name: OracleLocalDS
User: ODI_TEMP
Password: Password

                        vii.            In the JDBC tab mention as per below screenshot

JDBC Drive: Select “oracle.jdbc.OracleDriver”
JDBC URL: jdbc:oracle:thin:@<host>:<port>:<sid>
                     viii.            Click on Test Connection – Click Test – click Ok
                          ix.            Hence Data server creation Completed
Physical Schema:
       i.            Right click on Data Server (i.e.,OracleLocalDS)
     ii.            Select New Physical schema
  iii.            Enter details as mentioned below

Schema (Schema) – Data Schema à ODI where inserts and updates target tables
Schema (Work Schema) – Work Schema à Schema where all temporary tables (E$_,C$_...) are created and dropped by ODI
  iv.            Click on Save – Click on Ok

2.    Creating Context
Context:
Contexts bring together components of the physical architecture (the real Architecture) of the information system with components of the Oracle Data Integrator logical architecture (the Architecture on which the user works)

Process to Create:
i.                   Go to Topology navigator
ii.                 Expand Context Accordion

iii.              Click on the New Context

          Name: Context Name
          Code: Unique among various Repositories
v.                 Click on Save

3.     Creating Logical Architecture
Logical Architecture:
a.     The logical architecture allows a user to identify as a single Logical Schema a group of similar physical schemas - that is containing data stores that are structurally identical - but located in different physical locations
b.     Logical Schemas, like their physical counterpart, are attached to a technology
c.      All the components developed in Oracle Data Integrator are designed on top of the logical architecture. For example, a data model is always attached to logical Schema
Process to Create Logical Architecture:
i.       Go to Topology Navigator
ii.  Expand Logical Architecture
     iii. Expand Technologies and right click on Oracle Technology
           Click on New Logical Schema
           Select Physical Schema for context

           Click on Save

Tuesday, July 7, 2015

Creating Repositories Using RCU in ODI12c

·        Starting the Repository Creation Utility
a)     Navigate to Oracle_home/oracle_common/bin
·        Start RCU:
On UNIX Operating System:
./rcu
On Windows Operating System:
rcu.bat
1.1.                     Navigating Screens
1.1.1.  Introducing RCU – Click Next
1.1.2.  Creating Repository
1.1.2.1.      System load and Product load - If you have the necessary permission and privileges to perform DBA activities on your database
1.1.2.2.      Prepare Scripts for System Load - If you do not have the necessary permission or privileges to perform DBA activities in the database
1.1.2.3.      Perform Product Load – System load scripts have been run by DBA
1.1.3.  Connection Details – Provide DBA privileges
1.1.4.  Select Component – Oracle Data Integrator
1.1.5.  Schema Password – Password for Schemas (Note it down)
1.1.6.  Custom Variables –  Below details need to specify
1.1.6.1.      Supervisor Password – Note it down used for when we are connecting to Repositories from ODI
1.1.6.2.      Confirm Supervisor Password – Re-enter the password which you mentioned above
1.1.6.3.      Work Repository type – D or I
1.1.6.3.1.           D- Development Work Repository where all our development can be done
1.1.6.3.2.           I – Execution Work Repository where we can’t do any development (for example : In production environment we shouldn’t do development)
1.1.6.4.      Work Repository Name – Mention the name of Work Repository
1.1.6.5.      Work Repository Password – Mention the password of Work Repo
1.1.6.6.      Confirm Work Repository Password – Re-enter the earlier entered password
1.1.7.  Map Tablespaces – Nothing to do , defaults are fine
1.1.8.  Summary Page – Cross check and say create 

Unable to Connect an instance of the JVM


Error Message : When you are facing above mention issue while running or opening ODI studio.

Action:

  1. Right click on My "Computer"
  2. Go to Properties
  3. Click on Advanced settings
  4. Click on Environmental variables Button
  5. Under User Variable section click on new
  6. Variable Name : JAVA_HOME & Variable Value :  E:\SoftwareInstalled\JAVA7\jdk1.7.0_79 (Note : Specify the path upto jdk)
  7. Click Ok
Hence your problem will be resolved.

Monday, July 6, 2015

Automate the ODI12c Standalone agent (start)


File Name : "StartAgent.bat"
cd E:\SoftwareInstalled\Tools\ODI\Oracle\Middleware\Oracle_Home\user_projects\domains\odi_domain\bin
start /min startNodeManager.cmd
ping -n 20 localhost > nul
cd E:\SoftwareInstalled\Tools\ODI\Oracle\Middleware\Oracle_Home\user_projects\domains\odi_domain\bin
call startComponent.cmd OracleDIAgent1 <properties.txt
exit

properties.txt (place under - E:\SoftwareInstalled\Tools\ODI\Oracle\Middleware\Oracle_Home\user_projects\domains\odi_domain\bin)

<password of nodemanager> and save it


Could not reserve enough space for object heap

Error Message :
Error occurred during initialization of VM
Could not reserve enough space for object heap
Error: Could not create the Java Virtual Machine.
Error: A fatal exception has occurred. Program will exit.
Solution:
Create environmental variable _JAVA_OPTION and set value to -Xmx512M

Sunday, July 5, 2015

"Cannot find the javaw.exe"

While running RCU
Error Message : "Cannot find the javaw.exe"

Action:
JAVA_HOME is a regular path when ever we install JDK in our machine and if it is not supporting to other tools.

ODI_JAVA_HOME we need to set as same JDK path because ODI required Java engine and it is backgrond process for ODI studio

Process:
  1. Right click on computer 
  2. Go to Properties
  3. Advanced settings
  4. Click on Environment variables
  5. Click on new
  6. Set values      --- Windows

set JAVA_HOME=C:\Program Files\Java\jdk1.7.0_25
set ODI_JAVA_HOME=C:\Program Files\Java\jdk1.7.0_25 
  1.                     --- LINUX/UNIX
    export JAVA_HOME=/usr/java/jdk1.7.0_25
    export ODI_JAVA_HOME=/usr/java/jdk1.7.0_25

unable to access or modify the system registry

Error Message : unable to access or modify the system registry

Action:
Could you please open your Command Prompt with Administrator Privileges in order to run command Prompt with Admin Privileges

   Goto ----> start ----> All Programs -----> Accessories ---> Right Click on Command Prompt and select "Run as Administrator" option

Error: Could not find or load main class ûjar

Error Message : Could not find or load main class ûjar
Which means your java not properly installed . To resolve issue - reinstall JAVA it.

How to find version of Oracle?


SELECT version FROM V$INSTANCE; -- we can get exact version of database
/
SELECT * FROM V$VERSION; -- we can get detail information along with version (like bit - windows 32bit or 64 bit ....)

Friday, July 3, 2015

How to unlock User and Unexpire User in Oracle DB?

  • Login as Admin
    SQL> connect / as SYSDBA
    Connected
  • How to find accounts are expired and locked?
    select username, account_status from dba_users where ACCOUNT_STATUS LIKE '%EXPIRED%';
  • Unexpired Accounts 
    once an account has been expired, it can only be alter by assigning it a new password:
    ALTER USER HR IDENTIFIED BY HR;
  • Unlock Accounts
    ALTER USER HR ACCOUNT HR;
  • Disable default password expiry
    this all depends on the profile a user belongs to, to disable password expiry for all users assigned the default user profile do this:
    ALTER PROFILE DEFAULT LIMIT PASSWORD_LIFE_TIME UNLIMITED;

Unlock Account from SQL developer
        Log in as sys or system, then often three other user node and right click the hr user. Select edit from the           context menu and remove the check mark from 'lock account'